
Paint Bucket Tool


Selection history
|
|
|
|
|
|
|
Fill:
Tolerance:
Blend Mode:
Radius:
Blur:
Opacity:
| | |

|

|
✕ |

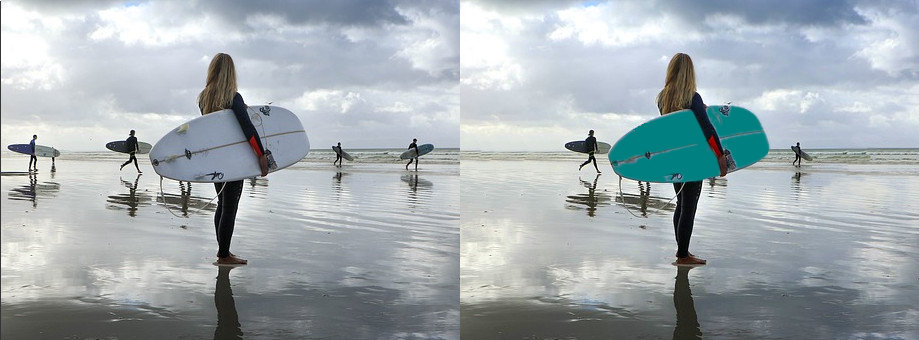
The paint bucket tool is a simple one click color replacement tool that is included in most image editors.
Simply click in the image to select the color and area that will be automatically replaced with a new color.
The paint bucket tool flood fills a continuous area of similar color with a selected color.
The range of colors that is flooded by the paint bucket is determined by the tolerance in the paint bucket tool settings.
A low tolerance means the paint bucket will only replace colors that are very similar to the pixel that is clicked in the image.
A high tolerance will cause the paint bucket to flood into areas that are less similar in color.
Upload an image to try the paint bucket tool.
- Upload an image using the form above.
- Adjust the settings in the tool options bar to set the tolerance of the paint bucket tool.
- Click the area of the image you want to fill with the paint bucket.
The paint bucket tool, with its one click operation, is among the simplest tools you can use in image editing.
When you click the image the paint bucket replaces color in an area by performing two tasks:
Setting the sample color is the first step in the color replacement routine but understanding how the paint bucket tool floods an area will help you see why a sample color is needed and will be explained first.
How the paint bucket tool replaces color is not unique to it. It employs the same flood fill method of area selection by color that is used in the magic eraser tool. The flood fill operation replaces the color of neighbouring pixels by scanning them for similarity to a sample color. If the neighbouring pixel meets the color similarity threshold, its color is replaced with the user set fill. This prodecure is then repeated for the replaced neighbouring pixels until all pixels that are neighbours and are similar in color become replaced or 'flooded' with the fill.
The sample color used by the paint bucket tool is set when you click the image. Here again the paint bucket tool acts like another tool. When the image is clicked the paint bucket tools acts like the color picker tool, selecting the color of the pixel at the mouse click point. This color is the sample color used for similarity checks in the flood fill operation.
The similarity threshold for flooding into neighbouring pixels is set with the tolerance input field in the tool options bar. The higher the tolerance the less similar in color a neighbouring pixel can be and still be flooded. This affects the flood area when you click in the image. A low tolerance means the flooding will be restricted to an area of the same color. A high tolerance means the flooding will spill over into more dissimilar colors and if set high enough may flood the entire image.
The other tool settings in the options bar also control the appearance of flood fill. The radius setting controls how the flooding interacts with neighbouring pixels. A higher radius will let the flooding fill in more areas and have less 'holes' in the fill area. The opacity, blur and blend mode options are explained in the next section.
- Selects the sample color that will be used to determine the replaced area.
- Floods the area with the fill set in the tool options.
Setting the sample color is the first step in the color replacement routine but understanding how the paint bucket tool floods an area will help you see why a sample color is needed and will be explained first.
How the paint bucket tool replaces color is not unique to it. It employs the same flood fill method of area selection by color that is used in the magic eraser tool. The flood fill operation replaces the color of neighbouring pixels by scanning them for similarity to a sample color. If the neighbouring pixel meets the color similarity threshold, its color is replaced with the user set fill. This prodecure is then repeated for the replaced neighbouring pixels until all pixels that are neighbours and are similar in color become replaced or 'flooded' with the fill.
The sample color used by the paint bucket tool is set when you click the image. Here again the paint bucket tool acts like another tool. When the image is clicked the paint bucket tools acts like the color picker tool, selecting the color of the pixel at the mouse click point. This color is the sample color used for similarity checks in the flood fill operation.
The similarity threshold for flooding into neighbouring pixels is set with the tolerance input field in the tool options bar. The higher the tolerance the less similar in color a neighbouring pixel can be and still be flooded. This affects the flood area when you click in the image. A low tolerance means the flooding will be restricted to an area of the same color. A high tolerance means the flooding will spill over into more dissimilar colors and if set high enough may flood the entire image.
The other tool settings in the options bar also control the appearance of flood fill. The radius setting controls how the flooding interacts with neighbouring pixels. A higher radius will let the flooding fill in more areas and have less 'holes' in the fill area. The opacity, blur and blend mode options are explained in the next section.
- Fill: The color that will be used to replace the area flooded by the paint bucket.
- Tolerance: Determines the acceptable range of colors that can be flood filled by the paint bucket tool.
- Radius: Sets the radius affected by each pixel in the paint bucket flooding.
- Blur: Blur radius of the paint bucket flood filled area.
- Opacity: Sets the opacity of the area filled by the paint bucket tool.
- Blend mode: Determines the blend mode when flooded area is applied to the layer.
Feature Rich Online Image Editor
Online photo editing with layers, layer masks, a workflow and user interface like a traditional desktop photo editor that provides you with the toolset and
features to professionally edit your images. No need to download or use desktop software like Microsoft Paint, Photoshop or GIMP to do quick edits. Edit your images online
with the best online image editor.
| Features | Gifgit Editor | Lunapic |
|---|---|---|
| Browser based editing (No software download) | Yes | Yes |
| Layers | Yes | No |
| Layer Masks (Non-Destructive Editing) | Yes | No |
| Selection tools | Yes | No |
| Undo History List | Yes | No |